Custom Sealed 24"x24" Grow Box

This project attempts to address a number of challenges that commercial products have a hard time resolving.

Security: tents aren’t lockable, which makes it harder to grow responsibly and safely in one. Commercially available grow boxes all seem overpriced, and few are more discreet than a tent.
IPM: unless the manufacturer applies a sealant to every seam, tent’s really won’t keep out persistent pests.
Modular Design: I don’t expect any version to be perfect, and I want to be able to modify/swap out components with reasonable ease.

I took some inspiration from theatrical flats; these lightweight walls come together and store compact when apart. These panels are 3/4" plywood strips glued to 1/4" marine plywood (painted flat white). Corners are butted together and sealed with a generous bead of black caulk before being screwed with 2" self-drilling construction screws. Each chamber has a “picture frame” flange top and bottom. These get sealed with black sealant, and screwed together. They also create a sturdy mounting point for hardware. The bottom of the crate is a torsion box, which would be overkill but could prove critical if there’s a heavy reservoir or 4 DWC buckets.


The first iteration was about 4’6". There were (2) 24"x24" connected chambers, and a top and bottom. It would work fine enough, but with a heater and humidifier on the bottom the plants would be crowded. It would be acceptable for hand-watered soil pots, but not ideal.

Note: The top is shown hinged up for clarity, but it isn’t meant to be hinged. It can be unscrewed if necessary.

A hinged door allows secure access to the plants. It’s sealed with an epdm foam door weatherstrip, and has a lock.

Electrical: There would be a PVC outlet box mounted in the upper section, containing two 15amp duplex outlets. PVC conduit would run from the box through a panel wall, sealed with fittings and sealant on both sides. The plug tail coming out of that would be firmly secured and sealed to the conduit fitting.

Ventilation: The air intake is a passive 4"x4" HEPA filter mounted in a light trap on the door. The exhaust fan would be a 4" AC Infinity Raxial inline model ducted to a 4" Vanleno carbon filter.

Heating: 1000watt electric forced air heater for New England winters.

Lighting: I’m gonna talk a lot about lighting eventually, but an HLG 100 4k or 3k would perform well. An HLG 135 R-spec would be superb. I’m strongly considering either a Mars TSW 2000 or a FC3000.

Misc Equipment: Various InkBird humidistat and thermostats, a 4" clip-on fan for circulation, a small humidifier, and a mechanical timer for light control.

Revision 1: An additional 20" tall section will be added below the plants to accommodate an electric heater, a humidifier, as well as two reservoirs (one for inflow and one for runoff). The access panel for the lower section will be unlocked, but light-tight. I changed the electrical plan to use a number (2-3) weatherproof outdoor power inlets (available for about $15/per) instead of the earlier conduit solution. It’ll make cable management easier, and should actually be less expensive. I’m also considering a comprehensive environmental controller like the AutoPilot Eclipse F60. The F90 is also in contention, but it’s only necessary if paired with a light like the TSW 2000 or FC3000, where elevated CO2 would actually be useful.


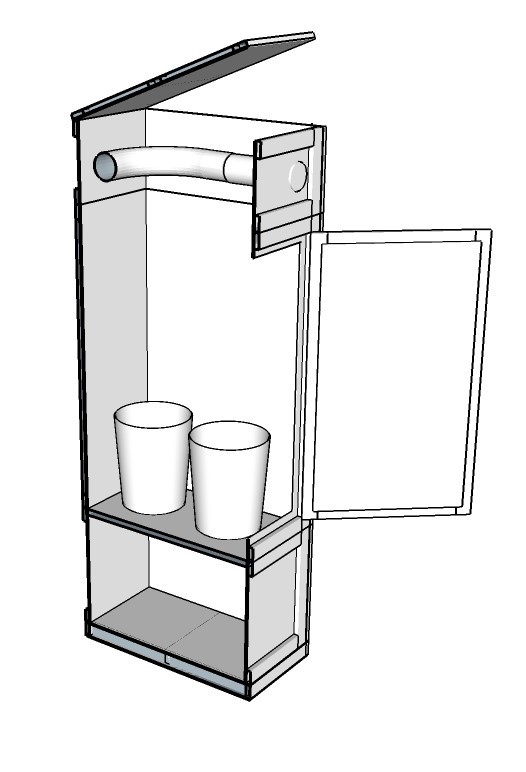
Shown with 5 gallon buckets for scale.

Exterior view.

Questions and comments are welcome.

9 Likes

Really cool I like it

1 Like

Any idea of total cost without the light

1 Like

Notes on Construction

Tools:
Tablesaw
Router with flush trim bit
Pocket-hole jig and screws, plus clamps
18ga. air stapler (5/8 staples
Titebond II
Cordless drill and 3/4 spade bit
Measuring tape and pencil
Circular saw optional

The flats start with 2-1/4" wide strips of 3/4 (nominal) plywood. I believe a single 4’x8’ sheet would suffice for the whole box.
I’d cut the strips to length on the tablesaw (or miter saw) before putting pocket-holes in them (where necessary).
After gluing and screwing the 3/4 frames together, I’ll glue them to slightly oversized 1/4" plywood pieces. The pocket hole would be facing the 1/4 ply, and the best side of the 1/4 ply would be facing away from the 3/4 ply.
I’d air-staple the skinned frames through the 1/4 ply side at a low pressure, to avoid blowing through the thin plywood.
After the flats dry I’d use the router to trim the 1/4 ply and excess glue to the squared frames.
The 1/4 side of the flat gets painted flat white. The outside should be painted black with a couple coats, because 1/4 ply might have voids in it that could cause light-leak issues.

Each section of the crate has a top and bottom “picture frame” flange. I feel like it’s going to be easier to cut these (out of 2-1/4" plywood strips) after screwing the walls together. I’d prepare them with additional pocket-holes to attach them to the walls.

If the crate is going to be on the floor, I’d omit a torsion-box bottom. But a rigid torsion box would let you put is on casters.

The door is going to be the trickiest part. Surface-mounted hinges are absolutely the easiest route, and if secured through the walls with a bolt/nut instead of a screw, they offer some security. Still, I expect the door to need some adjustment. It’s going to be important to get it light-tight.

3 Likes

Looks great to me.

1 Like

1 sheet 4x8 3/4 ply - $40
2 sheets 4x8 1/4 ply - $20 (subfloor) to $80 (marine grade)
White paint - $20-30
Black paint - $20-30
screws $20
Glue $7

material: $127-$207

The raxial is only $20!
Ducting is about $10
Clamps - $8
4" wall flange from HTG - $6
Misc eye hooks etc - free-$2
HEPA intake filter - $12
Carbon filter (Vanleno) - $29 on Amazon

Fan&filter installed: $82

The electrical solution from my revised design is the way to go. $15-20 per unit, and you can mount them in each section or on different sides.

It’d get expensive if you have to buy tools. So that’s what I’d try to avoid.

2 Likes

Interesting! Hope you don’t mind me tagging along.

1 Like

Wizardry!

1 Like

Circling back to lighting:

The HLG 135 R-spec is a very good fit for this space. However, I’m considering what a Mars Hydro TSW 2000 would do. Without CO2 elevated above atmospheric levels, the TSW would need to be dimmed down a lot, but that’s not really all that bad. My thought is that the 21”x20” fixture would get very even coverage, and I could run it very close to the canopy. And at ~$270, it’s a pretty good deal.

The FC 3000 had the same virtues, but it costs a bit more. I’m not sure I’d gain anything with it, but I’m glad to see Mars heading toward the PCB strip form-factor. Even if the gains are marginal, the cost of a CO2 system means the extra money spent on the FC is marginal. So if I decide to supplement CO2 above atmospheric levels, I’ll consider the FC 3000 as well.

@dbrn32 I wonder what you think about the value of using an oversized fixture running at a lower wattage?

2 Likes

This is sweet! Mad props for putting time into fit and finish.

Any of those solutions would work. Although it seems almost necessary to diy a light for the diy cabinet. Would also allow you to build out at current you intend to run instead of buying something with intention of running at less power.

3 Likes

Could I build a single, dimmable light that’s comparable or better than the Mars TSW 2000 for less than $200? Because the TSW is only $270, and my time is scarce.

2 Likes

What is the basis for “comparable”? There is no integrated sphere report. And as happy as you or anyone else may be with mars lights, they don’t exactly have the reputation to take their word for anything. There certainly isn’t any legitimate reason to build a 300 watt either.

1 Like

Thoughts on revision 2:
The intake location in the door, in a very cold garage, could create a microclimate that might be less than ideal. I’m considering a connected lung box to house an oil-filled heater and a larger humidifier/dehumidifier as necessary. The location I’d get to put this in would stay below 60f in the summer, and get’s down to the low 40’s in winter.

It could be an opportunity to use a larger MERV13 filter with much more surface area than the tiny HEPA filter I have spec’d currently.

2 Likes

I think with spaces this small you just have to plan the best you know how and try it.

2 Likes

Oh, I’m not putting the cart before the horse @dbrn32. Version 1 of the grow box is already finishing the first cycle in my brother’s garage in MA. I’m revising.

One interesting observation is that, for many months out of the year, lighting was a relatively small percentage of the operations cost. A tiny 1000w heater was running almost constantly (155w consumed with lights on/heater off, and 1150w consumed with both the light and heater on.) Even if I insulate, the heat loss is to the air exchange is ridiculous. Humidity was also lower than I’d like. That’s why I’m considering foregoing ventilation, and supplementing CO2. And that had me thinking about pushing lighting well beyond what a single 135 R-spec can do, and aiming for something closer to 1200 avg. ppfd.

The reason I’m interested in the TSW 2000 is that it’s about the same size as the canopy. It could be underclocked, and run really close to the canopy, which would be advantageous in this short space. So I’m trying to figure out whether to build a custom light, or if I can save some money by buying something off the shelf.

3 Likes

I couldn’t get high enough canopy temps in my space in June, July, and August. So I definitely feel you on that.

As far as the light goes, the strips are 560mm long. So you could just as easily build a 22"x22" light if that is a priority. If you don’t have the time or don’t value enough to spend the time is fine. Just seems like it would compliment the project well.

1 Like

I’m up for building a light if you think it’s worth it.

1 Like

I think so. The pricing on components is competitive. Sure companies get impressive volume discounts, but they also have all kinds of setup and tooling costs to go with labor and most importantly profit. Your time is valuable, but you don’t have to write anyone a check for it. Anything specific you want besides dimming?

I can’t think of any other integrated features, like a timer, that seem important. Are there features I should consider?

I doubt I’ll need to buy anything, except for the PCBs, pot switch, and driver. Might buy an extrusion, but might be able to get that for free.

1 Like

You wouldn’t want integrated timer, even though thry are available. If a timer takes a dump they are easily sourced locally.

I usually use driver with built in dimmer, but you can wire in pot if you prefer.

I think you would be good otherwise, unless you want something out of ordinary for led modules.