LIGHTS OUT!!! Make your own custom door seals!
Adding this here, so the “Free Side” Forum folks can refer to it if need be. It has its own thread on the “Dank Side”. ![]()
As the Lab courses say repeatedly: It is CRITICAL that the grow space be 100% light-proof during dark periods, whether during vegetative or flowering phases.
Some folks use closets or rooms indoors rather than lightproof tents, and interior doors seldom have seals or weatherstripping, so they are notoriously “leaky” to both LIGHT & AIR FLOW. We do NOT want this. It could screw up the plant biology, AND in case of mistaken positive interior pressure OR fan failure, you could wind up with your whole structure smelling like your crop!
I came up with this theory after spending $20+ on adhesive backed weatherstripping and FAILING miserably to completely seal the door to the closet I am converting to a grow space.
THEORY - Use 100% silicone sealant, et al. to create custom door seals.
ISSUES - Silicone sealant sticks to whatever it touches. Without intervention, simply beading the door frame and closing the door will create a PERMANENTLY sealed SHUT door. Useless! ![]() Thus, we must find a way for the sealant to bind with the door frame, but NOT stick to the door.
Thus, we must find a way for the sealant to bind with the door frame, but NOT stick to the door.
MATERIALS - Here is a list of the primary materials that I used to create my custom seals.
- GE Supreme Paintable Silicone Window & Door Sealant (White)
https://www.amazon.com/GE-SEALANTS-ADHESIVES-M90025-30-Caulk/dp/B0047GQWFU/?tag=greenrel-20
- Vaseline Petroleum Jelly Original
https://www.amazon.com/Vaseline-Petroleum-Jelly-Original-13/dp/B00I69T7TW/?tag=greenrel-20
- ScotchBlue ORIGINAL Painter’s Tape, Multi-Use, 0.94-Inch by 60-Yards
- American Safety Razor 65-0502 Single Edge Razor Blade Dispenser with Aluminum Back Blades, 100-Pack
https://www.amazon.com/American-Safety-Razor-65-0502-Dispenser/dp/B0035ER29A/?tag=greenrel-20
- MG Chemicals 824-1L 99.9% Isopropyl Alcohol Liquid Cleaner, Clear, 945 mL (1 US Quart)
https://www.amazon.com/MG-Chemicals-824-1L-Isopropyl-Alcohol/dp/B005DNQX3C/?tag=greenrel-20
-
Lint free cloth
-
Roll of paper towels (or other disposable wiping material)
PROCEDURES - Here are the basic steps to producing the seals.
-
Use the 99% isopropyl alcohol and lint free cloth to clean the areas of the door frame where you will be applying the bead of 100% silicone sealant.
-
Mask off the inside face of the door using the blue painter’s tape to restrict the area of petroleum jelly application. About 1-1-1/2" from the edge should be sufficient. (See image below)
-
Carefully and COMPLETELY apply a thin layer of petroleum jelly to the face edge areas that you just masked off. Additionally, apply a thin layer to the ENTIRE widths of the door edges, top, and both sides (the entire perimeter). Really massage it in to make sure you get full coverage, especially if there is exposed wood grain. Focus on the edges where there might be end grain exposed. Wherever you FAIL to get full coverage, the silicone will stick to the door… Not good!

-
Apply a bead of silicone sufficient to bridge the gap between the door and the door frame. You want it just big enough that it creates a good seal at the edges with minimum squeeze out, but too small and you WILL have seal voids and leaks! NOTE: You should know about how big the gap is, because BEFORE you started this, you closed yourself up in the closet and observed the door to frame fit with the lights out… Right? (See image below)
-
Make SURE you have everything out of that closet you are going to need for a while!!!

-
Now, slowly begin closing the door and use minimum pressure until you just barely hear/see the door latch slip into the striker plate. If you push it too far, you might squeeze out too much sealant and cause voids/leaks when it cures.
-
WAIT. Wait some more. Wait even more!! You must wait until the silicone is COMPLETELY cured. And because the area exposed to air is minimal thanks to the petroleum jelly, et al., this process will take at least TWICE what the label states for cure time… In my case, the label said 24 hours, and I waited a FULL 48 hours.
-
After cure time expires, gently open the door. Turn door knob fully and slowly increase pulling pressure until door pulls free. IF your petroleum jelly coverage was complete, it should not take more than about 20 lbs of force, and it will pull free without damage to the door face.
-
Using a single edged razor blade, trim the squeeze out where it protrudes into the door opening (if any).
-
Inspect the new seal for voids. Go inside closet with lights off, and examine the entire perimeter. It will be apparent IF and where the leaks are. Mark them, if any, with a pencil on the door frame. Repeat steps 3-8 with a supplemental bead of sealant in the leaky areas. NOTE: Be SURE to clean the seal WELL with 100% isopropyl alcohol before applying supplemental silicone bead, or the new bead will NOT stick to the first one!!! You’ll just make a mess and have to clean it up and repeat.
Congratulations! You now have a COMPLETELY air and light proof seal around the sides and top of the door. You still need to address the BOTTOM edge, which on most interior doors does not have a threshhold.
- Use one of these: Twin Draft Guard Energy Saving Under Door Draft Stopper
I use one like this one. It has a fabric sweep cover, BUT…
https://www.amazon.com/Twin-Draft-Guard-60220-Stopper/dp/B003ZSWER6
THIS ONE, I just found has a vinyl cover that MIGHT be better from a sanitation and mold prevention perspective. I don’t know if it would be as effective in light/air blocking.
https://www.amazon.com/Evelots-Double-Window-Stopper-No-Inches-Adjustable/dp/B0100CRCUI
Now, these things work well, but they are “universal” for multiple width and thicknesses of doors, so it is LIKELY that the inserts are not of sufficient diameter to accommodate the thinner door thicknesses of most interior doors. I removed the original foam rod cores, and inserted larger diameter black, closed-cell, pipe insulators. Mine were split down the length with liner-covered adhesive to seal them shut. I simply cut them to length and sealed them shut to assist them in maintaining their shape. The rod lengths may be a little different between inner and outer. The inner must be short enough to clear the door stop strip, but long enough to block the light. The outer rod MAY be a little longer to assist in blocking light better.
They make all kinds of diameters of this stuff. For the INSIDE, choose the MAXIMUM diameter that will fit into the pocket. For the OUTSIDE rod, choose a diameter that will make the sweep fit snugly against the door faces so that it will stay put when opening and closing the door.
Here’s the type of stuff I used to replace the rods (Available locally at home supply stores. Take a ruler and measure the outer diameters in-store):
https://www.amazon.com/M-D-Building-Products-50158-Self-Sealing/dp/B001G3YF8S/?tag=greenrel-20
- Go BACK in the closet with the lights off and check for leaks. Adjust, et al.
Congratulations!!! You now have a light proof and mostly air proof door seal!! ![]()
![]()
![]()
![]()
![]()
IMAGES: Here are some images for illustration:
Here’s an image illustrating how the door is masked off:

Here’s the door frame top corner where I am beginning to trim the squeeze out. Note the clean inside 90 degree angle impression in the silicone bead indicating a good seal.

Here is an image of the area where, upon inspection, I found a few leaks necessitating a supplemental bead

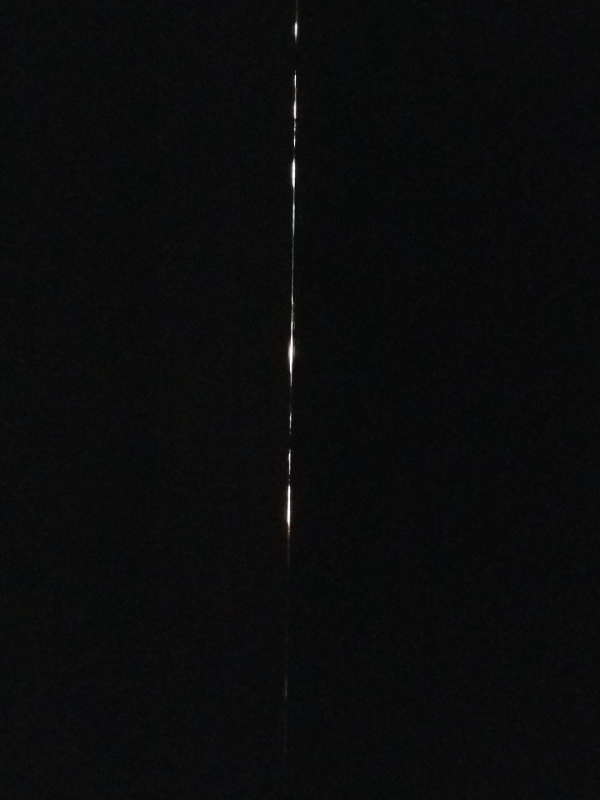
Here is a view from INSIDE showing how much light can enter via even a tiny leak.
I will post updates of the leak fix after I am finished.